Undoubtedly, patch panels have become an important component in cabling system, since technological advances open the door to a new generation of more efficient and higher performance data centers. According to different ports, patch panels are commonly divided into 24 port patch panel, 48 port patch panel, 96 port patch panel and even more ports. And all the patch panels can provide a simple, neat and easily managed solution for IT technicians. Today, we’ll focus on 24 port patch panel buying guide.
Why We Use 24 Port Patch Panel
As we know, using a patch panel can enjoy many benefits. It can reduce cable congestion, improve flexibility and scalability and save the valuable space in a sever rack. These contribute to the simplification of manual monitoring, testing, routing and other maintenance on cables. Besides, the 24 port patch panel price is more favorable than other patch panel types. And designed in the same size, the ports distances of 24 port type is not as compact as the 48 port or 96 port ones, which is better for cable connections and cable cooling. This encourages people to choose 24 port type instead of the others.
24 Port Patch Panel: Copper or Fiber
As the backbone of a structured cabling solution, patch panels are available in copper and fiber versions. They are designed to connect different cables. Copper patch panel are used to connect the specific cables like Cat5, Cat5e or Cat6, while fiber patch panel is only applicable for single mode or multimode fiber cables with LC, SC connectors. Thus, before we buy 24 port patch panel, we must know what type of cables that used in our network.
24 Port Patch Panel Recommendation
FS.COM offers a wide variety of 24 port patch panel to help address your specific needs.
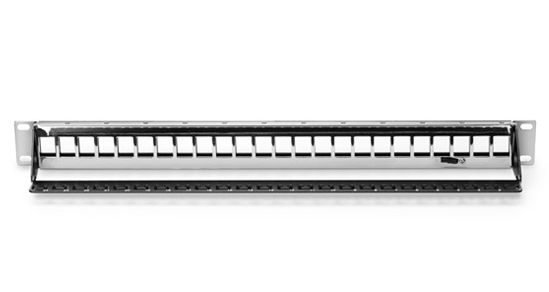
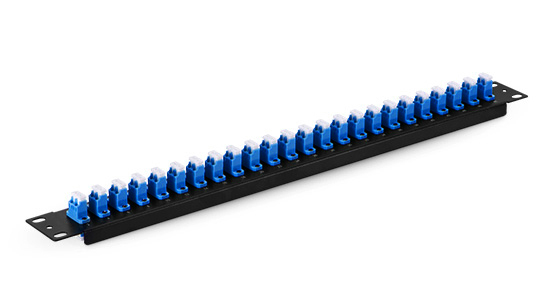
24 Port Patch Panel Cat5e
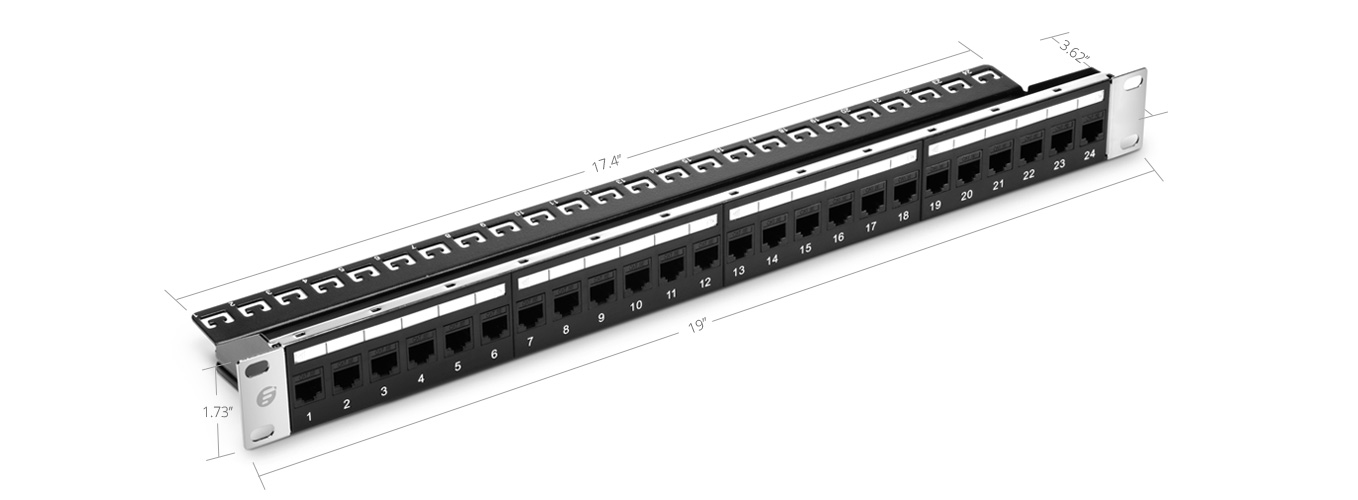
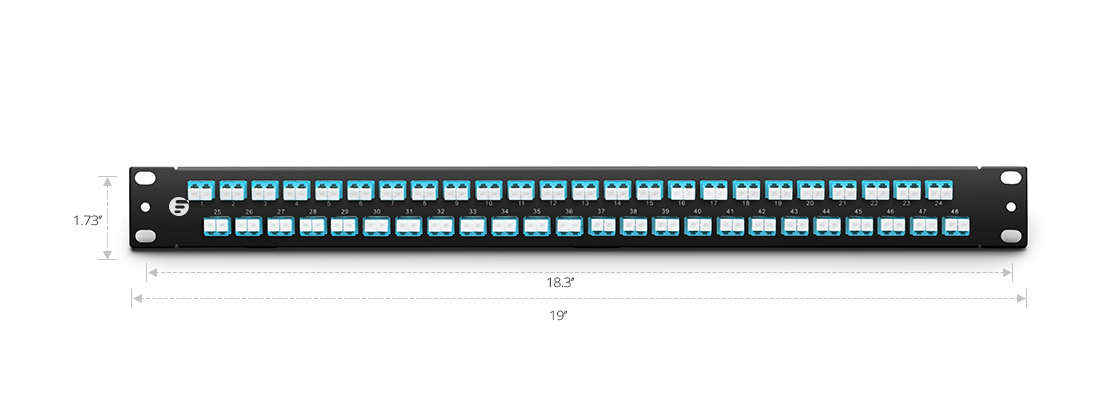
This 1U 24 port patch panel Cat5e features RJ45 couplers on both sides of each panel. It uses the removable design of the rear cable manager, which is conducive to uninstall and install. Also, it adopts the design of self-contained cable management tool, and no extra cable management equipment is needed. This Cat5e patch panel is made of SPCC+ABS materials with an operating temperature from -25℃ to 70℃.
Figure 1: 1U 24 Port Patch Panel Cat5e
24 Port SC Fiber Patch Panel
This fiber patch panel is applied to connect OS2, OM3 and OM4 fiber cables. Its sleeve material is ceramic, and its color-coded couplers will facilitate quick cable type identifications and permit more accessibility during troubleshooting, installation or redeployment.
Figure 2: 24 Port SC Fiber Patch Panel
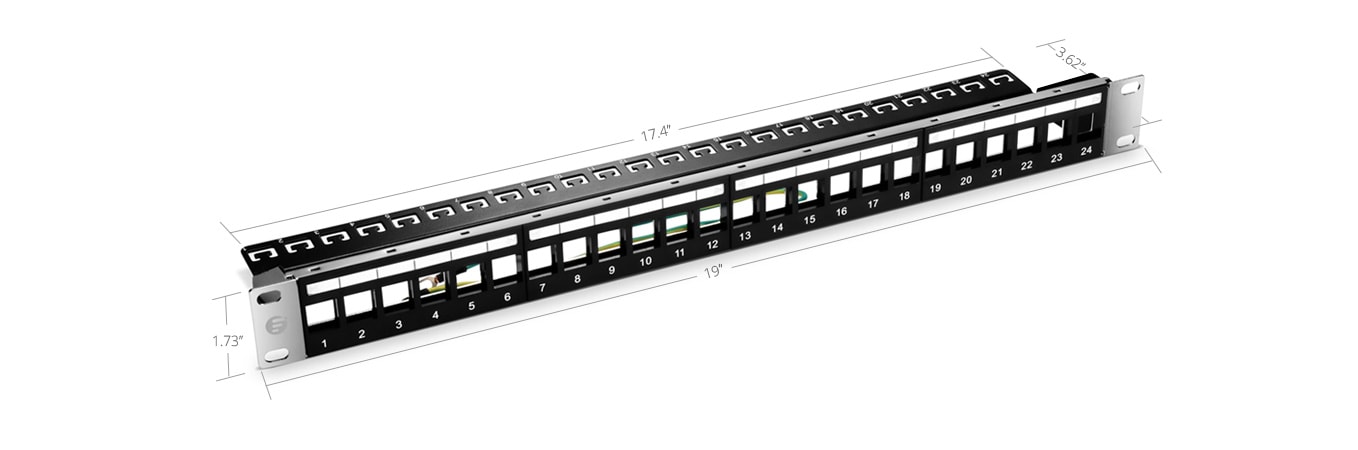
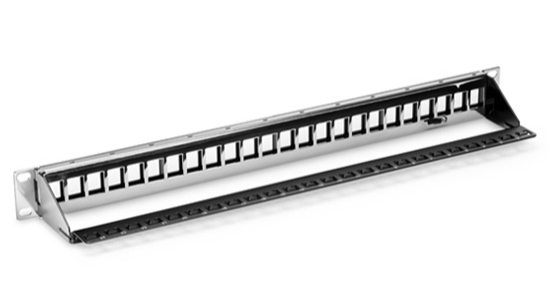
24 Port Blank Keystone Patch Panel
The 24 port blank keystone patch panel is an ideal tool to manage all copper cables like Cat6 or Cat5e, so you can customize your patch panel and create a perfect mix connection based on your specific applications. The lacing bar with sequential port labels integrated into the panel provides easy identification of multiple types of cables, which can manage cables more efficiently. Designed with the SPCC + ABS plastics, the material is stamped and formed to create a rigid and durable surface capable of withstanding the forces generated while punching down cables to the panel.
Figure 3: 24 Port Blank Keystone Patch Panel
Conclusion
From the above, I suggest if you need to connect copper cables such as Cat5e or Cat6 then choose the 24 port patch panel Cat5e or 24 port patch panel Cat6 type. If your cables are fiber cables, 24 port fiber patch panel is suitable for you. If you want to make the mixed connections, 24 port blank keystone patch panel is the best choice. So if you are ready to buy 24 port patch panel, please don’t be hesitate to visit FS.COM which is a supplier that offers a comprehensive range of patch panels designed to address a variety of needs.
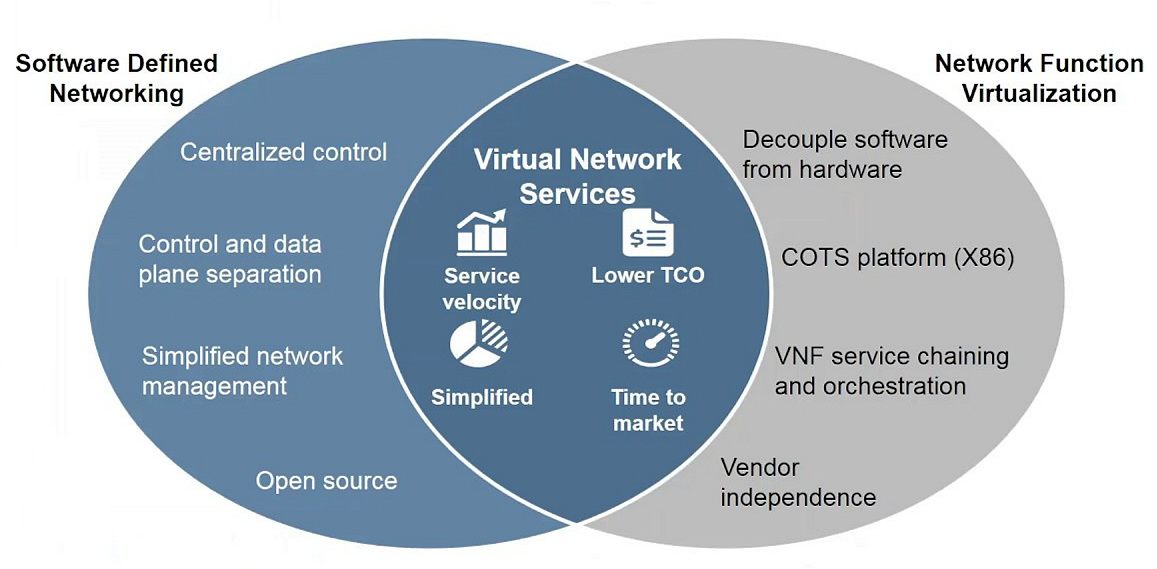
SDN and NFV that have emerged in recent years, are the most aggressive technology in the networking industry. SDN NFV are born to provide new ways to design, build and operate networks. What is SDN? What is NFV? SDN vs NFV, what’s the difference? Here talks about SDN and NFV.
Figure 1: SDN and NFV
SDN vs NFV—Definition
What Is SDN
SDN, software defined networking, started from the campus network. It developed to solve the network issue that people had to change the software of their devices when they tried to deploy a new protocol. SDN is a telecommunic ation revolution that separates the control plane of a network from the data plane that forwards one’s network traffic, aiming at creating a centrally managed and programmable network. As an innovative architecture of new network, it provides a way to implement network virtualization.
What Is NFV
NFV, network function virtualization, is developed by dozens of large telecommunication service providers. Often times, it’s difficult for them to accelerate the implement of new network services due to the restrictions of hardware-based appliances. Thus, the goal of NFV is to virtualize the network services such as DNS, caching, etc., and abstract them from the hardware on which they run, and hence they can run in software. NFV is a disruptive technological reform that offers a more open and flexible service deployment for telecom operators’ network architecture.
SDN vs NFV—Difference
From the above, we know SDN and NFV rely on virtualization so that the network design and infrastructure can be abstracted in software. But do you know the difference of SDN vs NFV?
Figure 2: SDN vs NFV
Basically, SDN abstracts physical devices like data switch or router and makes the controller process to a virtual network control plane. In this way, the virtual control plane will decide the locations for sending traffic. By contrast, NFV is designed to use the standard x86 server to replace the dedicated network devices like the firewall. As a result, the network function is independent from the dedicated devices, which enables the network to develop without extra devices. The table below shows the differences between SDN and NFV.
SDN vs NFV—Future Outlook
Since SDN and NFV share the same aims that improve software-based approaches to create more flexible, scalable and perfect networks to support the increasing business demand, they have become popular in the network industry. And there’s no doubt that SDN and NFV will work together with traditional switches or some other optical equipment in the future. To follow the technological trend, FS.COM has developed SDN switches to satisfy customers’ various needs.
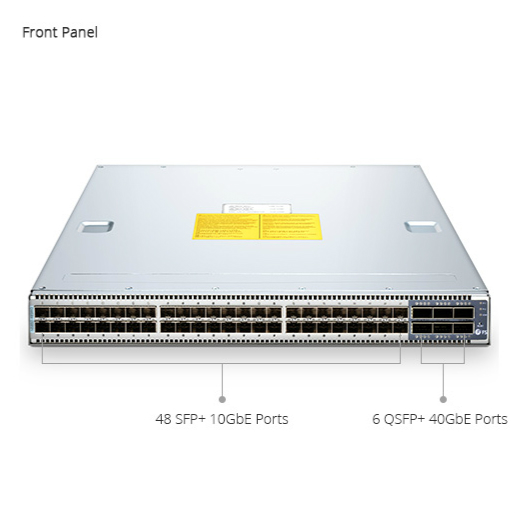
The N5850-48S6Q SDN switch offers 48 SFP+ 10GbE ports and 6 QSFP+ 40GbE ports that support non-blocking exchange. It adopts 1.44Tbps full-duplex switch capability with the operating system of broadcom ICOS, creating a more open installation environment for users. Compared with the traditional switch, this SDN switch separates the data path from the control path, which helps to make a high-level routing decision.
Figure 3: SDN Switch
Conclusion
As regard to SDN vs NFV, we have learned the basic information of them. Also, we recognize that SDN and NFV will make a difference in the future. FS.COM, the supplier of switches such as 10gb switch, 40GbE switch and even 100GbE switch, will keep pace with the innovations of network world.
LAN is widely used in the network to allow computers to connect with different computers of one limited area like a school, factory or building. While VLAN is functioned as a tool to improve Ethernet scalability. Yet, with regard to VLAN vs LAN, what’s the relationship between them and is there any differences? Hope you can find the answers in this article.
VLAN vs LAN—Definition
What Is LAN
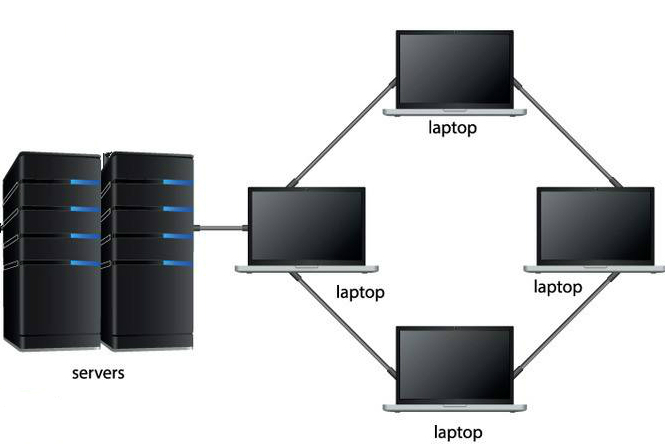
LAN is short for local area network, which can connect multiple computers in one location for sending data among themselves. It can be comprised of two computers in an office or thousands in a company, sharing a network that is closed to outside use. Today, LAN is defined as a single broadcast domain. This means within this LAN, if one broadcasts message, all the others can receive it. Also, functions like file management, printer sharing and working group scheduling can be realized by LAN, which will help to improve working efficiency.
Figure 1: LAN Example
What Is VLAN
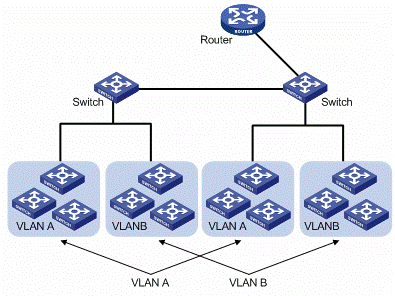
As the name implies, VLAN, or virtual LAN, is a type of LAN which improves the capability of a flat LAN. VLAN is the logical separation of LAN that can create several LAN segments in one bandwidth regardless of devices’ physical locations. Thus, technicians can use a fiber switch to segment a LAN into different broadcast domains (VLANs). Because the separations are logical ones, users on different floors of one building or different buildings now can share the same LAN.
Figure 2: VLAN Example
VLAN vs LAN—Differences
Basically, the need of implementing VLAN is to segment the network, which determines the differences when VLAN vs LAN. Initially, physical LANs mean that all working computers were connected to the same cable or sets of chained hubs. It’s a typically flat LAN. But with the technology develops, the demand of working computers on the LAN also grows. When one user wants to deliver a packet, he may find that the wire is already occupied by others’ packet. To solve this problem, the LAN should be split to eliminate the congestion and load. Only use Gigabit Ethernet switch or bridge can create VLANs. Since they’re logical separations, they can reduce the packet traffic. With a VLAN, it’s possible that working computers connect together on the same physical LAN but unable to communicate directly. The following table shows clearly the differences between VLAN and LAN.
Segment LAN into VLANs
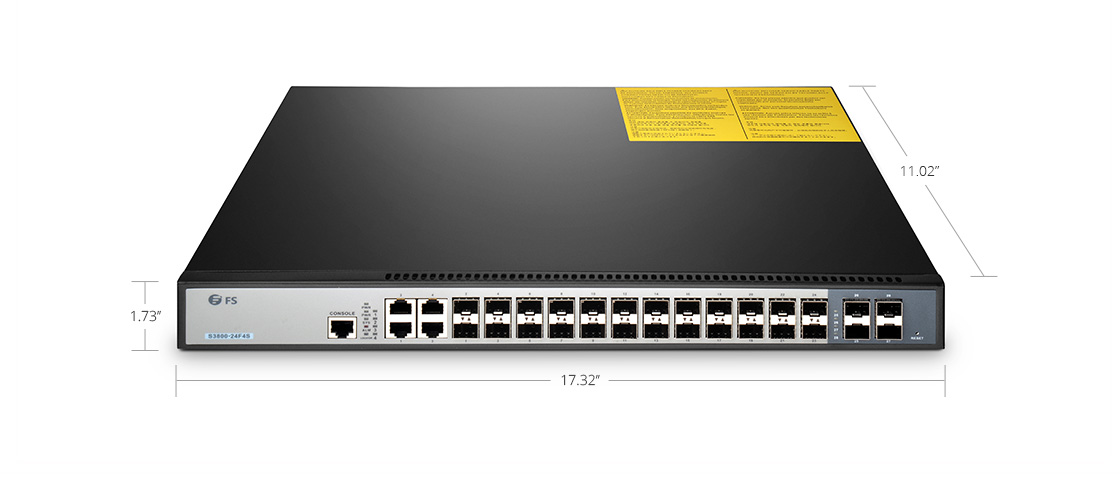
Knowing the differences between VLAN and LAN, we know how VLAN and LAN work. As switches are available, FS.COM offers 1GbE switch, 10GbE switch, 40GbE switch and 100GbE switch that support VLAN to optimize your network experience. Here is one S3800-24F4S 24-port Gigabit stackable SFP managed switch for your reference.
This is a layer2+ switch that supports 4 switches stack, 96 Gigabit ports and 8 10G SFP+ ports. The Gigabit Ethernet switch provides a switching capacity of 128Gbps and 4K VLANs. It adopts ARM CPU, a high performance and low power consumption processor, which can meet the needs of 10G network deployment of all enterprises and network operations. In addition, the switch has a good compatibility with all SFP transceivers on the market.
As regard to VLAN vs LAN, it’s’ important to know the differences between them. Then we can use network switches to segment LANs into VLANs to optimize our network. Hope FS.COM will be the best choice when you decide to buy network switches.
1U rack mount patch panel is generally used within a server rack, unlike the wall mount patch panel that is fixed on the wall. Facing the trends like high density servers and converged infrastructure that has result in amounts of cables in the server racks, rack mount patch panel is the perfect way to solve poor cable management at the source. Now I bet you come here because you have to choose one rack mount patch panel of some sort, but don’t know exactly how. Don’t worry, let’s start at the beginning. Before buying it, we should know why we need the rack mount patch panel.
Why Do We Need 1U Rack Mount Patch Panel
The main reason is that 1U rack mount patch panels have close relationship with cable performance. 1U rack mount patch panel as one tool of 1U cable management is the primary factor in maintaining high circuit performance during cable installation and use. It makes all cables connections in order so as to avoid cables becoming tangled and messy, and all changes can be made at the patch panel. Also, with all connections are made on the equipment, rack mount patch panel can save wear and tear on the ports of expensive equipment like switches, which helps reduce equipment cost.
Factors We Should Consider When Buying 1U Rack Mount Patch Panel
Rack mount patch panel seems a simple product, but there are still some aspects make you wonder. The following are the aspects that should be considered when you shopping one 1U rack mount patch panel.
Space and port requirement. Before buying a rack mount enclosure, first determine your requirements of space and ports because patch panels are available in different sizes and types. For standardization purposes, rack mounts are usually 19 inches and given in U units range from 1U to 4U. Make sure you know the height, depth, width and weight of the equipment.
Budget. Money always is the unavoidable issue. Establish a budget for the equipment, then you can narrow the buying scope and make the final selection.
How to Choose 1U Rack Mount Patch Panel
FS.COM offers different versions of 1U rack mount patch panel to meet customers’ needs. Here are three products and pick one based on your need.
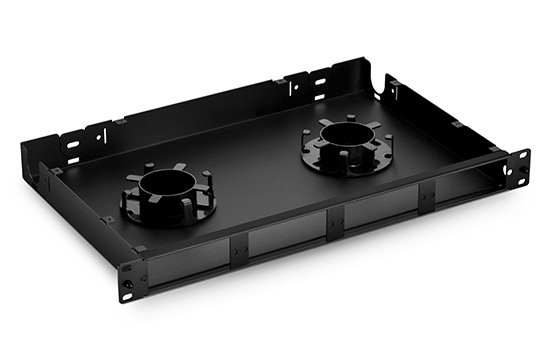
1U Rack Mount Fiber Enclosure
This rack mount equipment is made of SPCC material with black coating. It can accept 4 fiber adapter panels of LC, SC ports or 4 MTP modular cassettes, which can connect 96 fibers. The top panel uses the demountable design that allows you to put 4 splice trays or 2 slack spools to manage and protect your cables. The equipment is suitable for small or medium communication room with a favorable price of 68 dollars.
1U Rack Mount High Density Fiber Enclosure
Like the former 1U rack mount equipment, this fiber enclosure uses the same material and also can hold 4 fiber adapters or MTP cassettes, connecting 96 fibers at most. But this high density device adopts a new design of parallel sliding drawer that pulls the drawer out you can manage the cables inside the device, instead of removing the top panel. Another creative design is the semi-transparent design of front door, which makes it more convenient to check the inside cables and protect the cables from the dust. It’s an ideal solution for high density cabling with a price of 89 dollars.
1U Rack Mount Ultra High Density Fiber Enclosure
Featured with 3 independently sliding drawers, this ultra high density equipment can house 12 MTP cassettes or fiber adapter panels. Thus, with the 50% increase in usable density, it can connect 144 fibers in 1U server rack. And the open design of the back can improve the airflow which is beneficial to equipment cooling. This equipment enjoys a higher price of 120 dollars for it’s designed to satisfy the most extreme fiber density demands.
The following table is the comparison of the three products.
1U Rack Mount Fiber Enclosure
1U Rack Mount High Density Fiber Enclosure
1U Rack Mount Ultra High Density Fiber Enclosure
Sliding Version
No
One sliding drawer
Three sliding drawers
Material
SPCC
SPCC
Aluminum
Fiber Count
96
96
144
Price (USD)
$68
$89
$120
Summary
If you want to buy a rack mount patch panel with good quality at low price, the 1U rack mount fiber enclosure can satisfy your need. If you prefer to protect cables from dust, the second product is suitable for you. And if you have to deal with ultra high density fibers, choose the last product. Whether you are ready to buy a rack mount patch panel, FS.COM is here to help. Get in touch with us via our website FS.COM.
1U horizontal cable manager is the ideal solution to manage cables on the front and rear of each 19 inch server rack. Because with the emergence of high density rack-based IT server installation, data communication and cabling that must be processed within the tight rack space. Horizontal cable manager is regarded as the horizontal cable organizer, which can avoid cable damage and failure, ensuring the network operation.
Why Do We Need 1U Horizontal Cable Manager
1U horizontal cable manager is one tool of cable management that matter the whole network system health. It offers a neat and simple way to manage the cables, and simplifies network maintenance and costs. This is the main reason that makes it popular in the data center.
For the technicians who want a clean and orderly work area, they can make the cables go through the 1U horizontal cable manager, creating a clean look for the rack.
For the technicians who have a desire for easy maintenance and low costs, the cable manager can help them protect the cables radius bend and reduce the wear and tear, which decrease the cables expenses in some sense. Besides, it provides easier access to internal rack components, performing easy move, adds and changes to connections, which can greatly save time and money.
How to Select 1U Horizontal Cable Manager
FS.COM offers some styles of 1U horizontal cable management tools with different options of cable support. Choose the appropriate cable management device based on your actual needs.
1U Horizontal Cable Manager With End Rings
This cable manager uses a sturdy SPCC metal construction with a max cable capacity of 70. Due to the design of four D-type rings on the panel and two rings on both sides, it can manage vertical and horizontal cabling at the same time. In addition, the rings can provide cable strain relief for more reliable connections.
1U Single Sided Horizontal Cable Manager With Finger Duct
It’s a solid little cable manager with flexible fingers on the front, which can offer a proper bend radius protection. Although the manager is made primarily from plastic material, it’s extremely tough and has excellent wear resistance. The max cable capacity of this single sided horizontal cable manager is 44. Furthermore, there is a detachable cover on the fingers that can protect the cables from the dust and give you a more professional rack looking.
1U Blank Rack Mount Fiber Patch Panel With Cable Management Panel and Lacing Bar
It has five rings stand vertically on the front panel. The lacing bar is dismountable that allows users to put it on the front or back of a server rack according to their cable management demand. With the black metal design, it tends to be highly durable which reduces the equipment spending.
If you want to house the vertical and horizontal cables simultaneously, 1U horizontal cable manager with end rings is an economical choice. If you are in favor of a dustless environment, 1U single sided horizontal cable manager with finger duct can satisfy your requirement. If you want a more flexible cable solution, then choose 1U blank rack mount fiber patch panel with cable management panel and lacing bar.
Manage cables in the server rack with FS.COM 1U horizontal cable manager. These cable management devices are made from the highest quality materials to provide an unique method for the cross connect.
It’s well known that network technology is changing, but the critical aspect can’t be changed or replaced—patch panel cable management. If the key component is missing, the data transmission will be interrupted and fail to arrive at the destination. Patch panels, as the nerve center of a network system, can ensure the signal to work in ordered and friendly way. But how to install patch panel? And what’s the patch panel installation guide? This article will give you several suggestions.
Types of Patch Panel
Patch panels are available in copper and fiber cables. And designed with different port types and uses, patch panels from FS.COM are divided into 24 LC fiber port patch panel, 24 port SC fiber patch panel, 48 port LC fiber patch panel and so on, and copper patch panel can fall into 24 port cat6 shielded/unshielded patch panel, 24 port cat5e shield/unshielded patch panel and 24 port blank keystone patch panel. Here, we will take the 48 port LC fiber patch panel as the example to explain the patch panel installation.
48 Port LC Fiber Patch Panel
With the size of 19”×1.73”, this fiber optic patch panel is suitable for installing on the 19 inch server rack. It has duplex LC adapters that allow a two-way data transmission between the connecting devices. The 48 port LC fiber patch panel uses C.R.S powder coating, which is fully in line with national environmental standards, can be placed indoors. High density port design makes it connect 96 OM3 or OM4 fibers at most, which is much more than the 24 port patch panel.
Patch Panel Installation Guide
Only follow the right steps can achieve a reliable network. There are two aspects of patch panel installation guide for your reference.
Planning. A successful work starts with a good planning. You should figure out the issues, the network speed, distribution location, and cables length. Make sure you know the specification and design of the patch panel installation.
Preparation. Preparation work can reduce disconnect time. Prepare the main tools, 1U rack mount fiber enclosure, 48 port LC fiber patch panel and screws. Check the cable length for ensuring the cables that could be long enough to pull. And label the ports to identify different cables, in order to guarantee the technicians to have clear information on what they need to do.
Installation of 48 Port LC Patch Panel in a Server Rack
First, we should install the 48 port LC patch panel in the 1U rack mount fiber optic enclosure. Remove the front panel of 1U rack mount fiber enclosure, then install 48 port LC patch panel and fasten the screw.
Second, fix the equipment in the server rack. And leave some space between the patch panel and other devices, for cables management and future change.
Third, try to connect OM3 or OM4 cables to the patch panel in one pull, which helps to protect the bend radius. Comb and bundle the cables, and put them into the patch panel trunking, then cover it with top panels.
Last, don’t forget to clean the work area when you finish the patch panel installation, because the optical fibers are sensitive to dust and dirt. Therefore, try to keep clean when working with fiber optic cables to make them achieve their full performance.
FS.COM offers a vast selection of patch panel installation products and accessories that meet the international standards for supporting your network needs. For more details, please contact us via sales@fs.com.
It’s well known that server room has become an important indicator of one’s healthy network. Although wireless technology can avoid the possibility of cable clutter when compared with the wired connection, sever rooms still have lots of network cables, fiber optic cables and peripheral wiring. Thus server room cabling nightmare may appear if the big amount of cables on the server rack is disordered. For installers and engineers, it’s important to avoid server room cabling nightmare to ensure a well operated network center.
Reasons to Avoid Server Room Cabling Nightmare
Often times, the server room cabling nightmare is related to crowding and stacking things. For example, new equipment may be piled up around or on the top of the old equipment. Disordered cables look like a big bowl of spaghetti that may wreak havoc on the server environment.
It costs you in equipment wear and tear. When the excessive cables and extra equipment are placed together in a server rack, it may result in equipment overheating since the cables block the airflow or ventilation, generating much heat and stress, which may eventually lead to slow-down and even shorten the life of all equipment.
It costs you time and money. The fiber cables and power cables will easily become twisted if the cables are not managed well. In turn, this will cost you a large amount of time to dig through the server mess when you want to change the specific or broken cables.
Tips for Organizing Server Room Cabling
To avoid server room cabling nightmare, here are several tips for you to organize the cabling.
Make the server room dust-free. Dust not only makes the room look dirty, it also can fall into the hardware and cause equipment failure especially when it piles up inside the hardware vents. Therefore, the heat can’t be dissipated from the equipment which will lead to overheating. Thus, the server room should be cleaned every day to prevent dust accumulation.
Apply sound cable management. Poor cable management will not make positive effects on network system, instead, it may cause hardware malfunction. Proper cable management tips contain the colored labels for identifying, suitable fiber optic enclosures for cable managing. In this way, the cables can be protected from winding.
Spacing the equipment. When you decide to set up the server room, make sure that you have planed where to place the racks. A suitable distance should be measured between each rack for air dissipation and future expansion. In addition, the location of equipment such as fiber optic patch panel and switches in a rack should be considered.
End Server Room Cabling Nightmare with FS.COM Equipment
There are several equipment from FS.COM to help you maintain a neat and tidy server room, avoiding server room cabling nightmare.
42U Server Cabinet
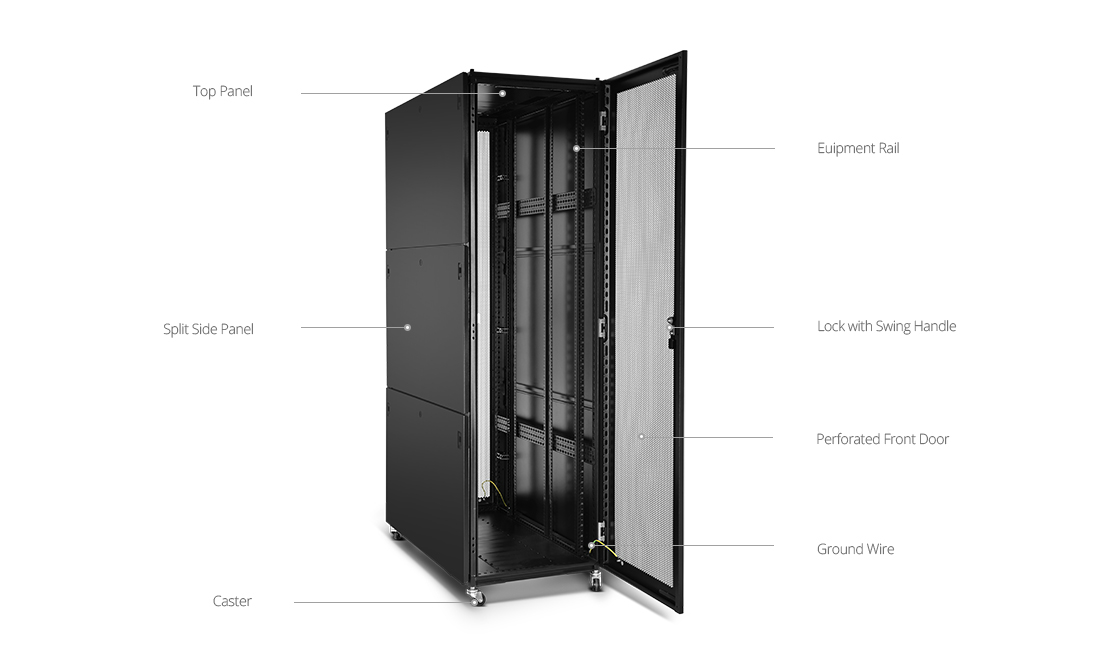
42U black server cabinet can accommodate all 19 inch EIA standard networking equipment, providing additional space at the rare for cable management. It consists of several major components, top panel, split side panel, equipment rail, and perforated front door. In the back, it adopts the design of air mesh which allows ventilation and heat dissipation. The cabinet uses SPCC cold roll steel material, firm and durable. It’s the simplest way to handle hundreds of cables.
1U Rack Mount Fiber Enclosure
1U rack mount high density fiber enclosure is available for 4 fiber adapters or cassettes that can connect 96 fibers. The body is made of SPCC cold-rolled steel plate, finished with electrostatic powder spraying. It can maximize the use of limited space in a rack to protect and manage fiber cables with easy installation.
Server room cabling nightmare is the greatest challenge in the network system. To solve this problem, it should be done with the professional network solution supplier FS.COM. For more details, please visit FS.COM.
Data centers are the repositories in today’s online world, and they’re also regarded as the heart that may pump the lifeblood of one’s business. Inside the data center, numerous issues may break the center, so if anything goes wrong, so does the business. Wrong cabling is one of the issues that may be ignored by most people. But with patch panel labels, technicians can simplify troubleshooting and increase management efficiency.
Label Standard
Clear labeling is the groundwork of a professionally installed network system. There is a set of standards named TIA/EIA-606 that aims at fully addressing the administrative demand for telecommunication equipment, cabling system, and other telecommunication infrastructure. For example, the original TIA/EIA-606-A have defined the general administration, but haven’t had specific needs of data center’s design and installation. Another version, TIA/EIA-606-B is backward compatible with the traditional version A, with a purpose of being a universal labeling standard that applies to all types of premises. And in the set of standards, they have explicitly stated that in one building especially the multiple telecommunication spaces, hardware like patch panels, IDC blocks, and copper or fiber cables should be labeled and recorded.
Importance of Patch Panel Labels
Achieving traceability is the main reason for using patch panel labels. Within one server rack, fiber optic patch panel is commonly used for horizontal cable management that acts as the unit to connect and route circuits for monitoring, interconnecting and testing. Patch panel labels include the patch panel identifier. If practical, each port of a patch panel should be labeled. Using patch panel label accelerates the traceability of the relevant cable links. It helps when the technicians need to find the specific cables.
Labels on Patch Panel
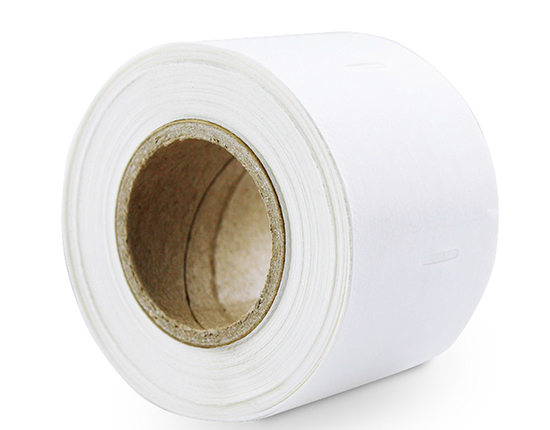
Labels can be used for all patch panels. Here is an example, 24 port blank keystone patch panel on FS.COM, which permits users to create a mix connection of voice, data, and video. The empty design of this Ethernet patch panel makes it possible to accommodate various snap-in jacks, so the users can insert cat5e or cat6 adapters based on actual needs. Beyond the empty port, there are white plates where you can paste the adhesive labels to mark the cables. Users can quickly find the specific cable that needs to change or upgrade, increasing working efficiency. Some adhesive labels are also available in FS.COM: P-type and winding type cable label.
P-type Adhesive Label
FS.COM provides P-type cable adhesive label paper in red color. It’s a simple identification that is resistant to water, oil, and scratch. Besides, it will not generate debonding in a low-temperature environment and easy to peel off.
Winding type Adhesive Label
Winding type cable label from FS.COM uses an easy wrap-around design, providing a clear and simple identification. With the design of non-slip, it can be pasted on patch panels for cables records and placement instructions. For the best practice, all labeling should be visible especially doing the maintenance.
Conclusion
Patch panel labels are the effective-cost solution to solve network operation breakdown. When it comes to modifying, repairing and upgrading anything, labeling makes it convenient for your job. For more input on the data center, get in touch with the experts at FS.COM.
Server rack is such a useful kit to deploy in the large data centers. Commonly, there are two basic methods to build a structured cabling system. One is to have a patch panel in the rack, and the other one is to use the switch. Both the two methods are beneficial to managing fiber cables. Today, we will talk about the first one, server rack patch panel.
Why Use Patch Panel on Server Rack
The reason is simple: installing patch panel on server rack can make a proper cable management. This is crucial to build a better network system and ensure a well running status as it provides the technological backbone. First, without a patch panel, all cables may be in jumble and increase the risk of cable congestion. It may lead to connection fault and even the losses to the enterprises. Second, disordered cables can cause clogged airflow, which is harmful to hardware safety. We know, all electric devices will generate heat when they run. So it needs more space for air flow to cool. Server rack patch panel is such a good way by managing different port densities and speeds in one high density patch panel, then the valuable rack space is saved. The approach can actually promote the air flow and protect the hardware.
Considerations When Organizing Server Rack Patch Panel
Here are a few facts to consider when you organize sever rack patch panel.
Equipment location. According to the convenience and available space, choose the rack location. Find the cold spots in the room, then place the rack front facing the cold area that can offer the maximum cooling for the hardware. In addition, make sure that there is enough space around to conduct any service.
Manage copper and fiber cables separately. Try to run copper cables on one side and fiber cables on the other side. Thus copper and fiber cables will not mix. Besides, if the cables lay closely, it may cause interference or crosstalk. Managing the cables separately can help to make an easier access to the equipment when it needs to be upgraded or changed.
Best Selections of Server Rack Patch Panel
Server rack patch panel is one kind of horizontal cable management. Traditionally, a majority of data center equipment uses 19 inch wide design. Now I will introduce some equipment from FS.COM for your reference.
45U black server cabinet can accommodate all 19 inch EIA standard networking equipment, like FHD fiber enclosures, MTP cassette, and FHU patch panels. This server rack includes a welded and assembled steel frame construction with a static loading capacity of 3527lbs. The design of perforated doors allows maximum airflow to be drawn through the server cabinet, which is good for maintaining the devices installed on the cabinet.
The unshielded 24 port blank keystone patch panel is an ideal tool to manage both copper and fiber cables, so you can customize your patch panel and create a perfect mix connection based on your specific applications. This patch panel adopts the design of removable rear cable manager, which is conducive to uninstall and install. And it can be labeled for easy connection identification.
All these are good practice of server rack patch panel. When you need to set up a data center, welcome to FS.COM to select the best products for your network system.
Structured cabling installation is the main part of a flexible structured cabling system that will support different hardware uses and satisfy current and future demands. Since the thousands of forms of online data transfer, and the gathering of business intelligence has made a significant influence on today’s commerce, the companies want reliable and structured cabling installation to hold the infrastructure of data connections. Now, I want to share something about its installation with you.
Importance of Structured CablingInstallation
A proper structured cabling installation gives a universal platform on which you can build the overall information strategy, supporting multiple voices, data and media system, regardless of who manufactures these. In essence, compared with traditional point to point cabling system, the structured cabling system is more neat and organized. It has many benefits for one’s network operations.
Support future upgrade. High bandwidth is the most significant benefit of the structured cabling, which makes it a reliable infrastructure for business data growth. With structured cabling, you can ensure connectivity of the enterprise while business divests into new technological areas and equipment.
Reduce cabling bulk and congestion. The organized and planned cabling system can accommodate smaller diameter trunk cabling, and makes a cleaner cable management.
Reduce installation time and cost. Using a structured cabling system, users just need to plug the equipment cables into the matched sockets when upgrade or change the network. No need to buy additional wires or adapters.
Tips for Structured Cabling Installation
Since the structured cabling is the critical part of one’s network, here are several tips for the proper installation.
Planning comes first. In this stage, you must have a comprehensive understanding of your actual needs, figure out a solution based on the location, cabling types, and the needed equipment. Planning the installation will enable the actual work and operations run more smoothly.
Follow the cabling standards. When you install the cables, please follow the cabling standards because there are standards that have specified the multiple cables for different uses. Following the standards will greatly improve the efficiency of cables and data networks.
Remember the maintenance is important. Once the cables are installed, the maintenance becomes important. Buy a server rack or other equipment to manage and maintain the cables, which will save you lots of money and time in reality.
Choose the Right Equipment for Structured Cabling Installation
Vertical cable management and horizontal cable management are the two methods used in structured cabling installation. Choose the right equipment is the top priority. There is some equipment from FS.COM.
Single sided and dual sided vertical cable manager are available on FS.COM. This 45U 4.9" wide plastic single sided vertical cable manager is designed with flexible fingers to protect cable radius against damage. It can route cables vertically either on the front or back of racks. With a PVC cover, the equipment can avoid the dust and increase service life.
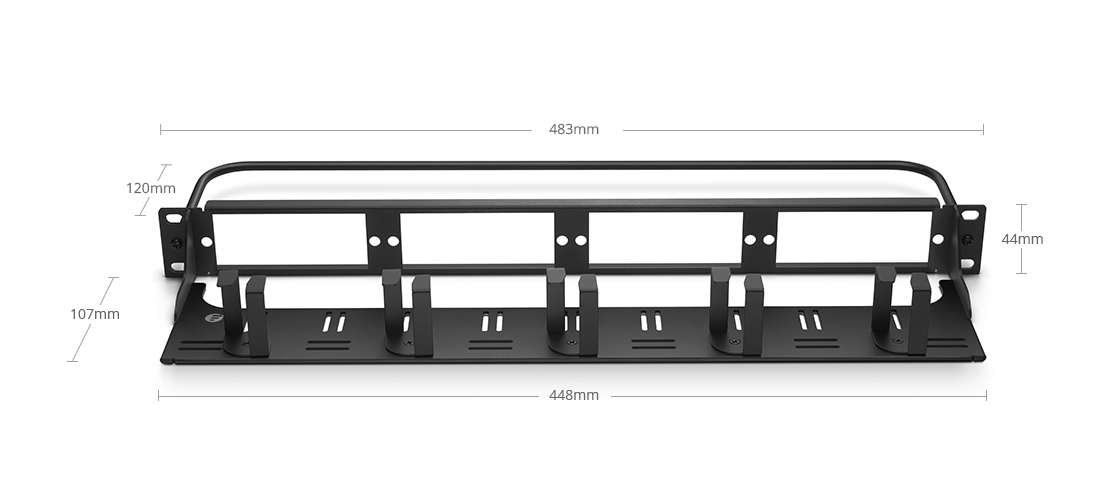
1U 19inch blank rack mount fiber patch panel is commonly used for horizontal cable management. It offers different choices for one’s application by being separated into patch panel, D-rings and lacer bar. This equipment is a cost effective cable management solution used in high density cabling system in data centers and telecommunication rooms.
From the above, we know structured cabling is the backbone of all business. FS.COM is the "one stop shop" for all cabling installation.
Patch panel cable management is a common practice in network system. This because technology develops at an unbelievable speed, consequently, today’s server rooms are featured with a large number of different bandwidth-intensive devices, such as clustered storage systems, blade servers, virtualization applications or some other backup devices. These devices are all interconnected via network cables or cable management tools. Besides, it’s known that challenges in server rooms arise not only with trying to pursue the increasing demand of higher performance and flexibility in order to achieve a scalable and manageable cabling infrastructure, but also with evolving cabling industry standards, which sometimes may determine future’s cabling offerings standards for technological growth. To solve those problems, patch panel cable management is a wise choice in the physical plant.
Benefits of Patch Panel Cable Management
Patch panel cable management describes how fiber cables are connected and managed in a patch panel. Fiber optic patch panel is a very popular cable management tool used for wiring fiber cables in an organized way. And a correct patch panel cable management will deliver several advantages, which will enhance one’s network availability.
Reduced signal interference. Patch panel makes the cables in their corresponding positions, that means the cables will not interfere with each other. This can greatly reduce the crosstalk and interference between cables and ensure cables’ performance.
Improved serviceability. Patch panel allows technicians to recognize which cable should be changed or upgraded easily, minimizing working time and improving safety.
Cooler function. Thanks to the fix positions of cables in a patch panel, there is more space within a rack for air flowing. It brings down the whole equipment running temperature.
A roadmap for growth. Labels on the patch panel is an effective cable management which gives the direction to technicians to scale and adapt to changes in cabling infrastructure as well as reducing service time.
Tips for Patch Panel Cable Management
Here are several patch panel cable management tips for network installers.
Start with measuring. Remember the adage “Measure twice, cut once”. Measure the cables’ length needed for a patch panel carefully, to avoid messy cabling and expensive cable waste.
Don’t forget the labels. Just take some time to mark clearly on the connection point, which will pay off in the long run.
End with testing. After connecting cables via patch panel, test each cable by using a quality tester. If the test doesn’t pass 100%, reconfigure the cable. Believe me, this step will avoid lots of extra work in the end.
Patch Panel Cable Management Solutions
Patch panels are available in different categories based on various ports and designs. Confused about which one will work for your application? FS.COM is the right way for your cabling design. The following are the two products sold well from FS.COM.
24 port fiber patch panel is the best choice for small LAN cable management. This 24 port LC duplex fiber patch panel with a max cable capacity of 48 OS2 single mode fibers is suitable for 1U high 19 inch frame rack mount or cabinet. The ports are in the upright design with folded sides, providing a cold aisle orientation for cables.
Wall mount patch panel is a wise practice in the limited room. This fiber optic wall mount patch panel can hold 4 standard FHD series adapter panels. The max cables capacity of this type is 96 fibers. Equipped with slack spools, strain relief and silica gel stopple, the wall mount patch panel can protect cables bend radius and prevent dust.
FS.COM patch panel cable management tools are ideally designed to store, protect and terminate fiber cables and connectors. Need help with setting up a patch panel cable management? FS.COM is the definitive choice for all your optical fiber needs.
Rack cabling may be the backbone of one’s information technology operation. All data or signal are delivered by the cables, so maintaining and running the critical circuits that are managed by these cables are of great importance. Any mishandled cables on the key link paths can lead to bad results, such as data transmission errors or performance issues. So how to organize and protect fiber cables? This 1U rack mount enclosure will help you. First, let’s look at the structure of 1U rack mount enclosure.
Structure of 1U Rack Mount Enclosure
Before we properly use fiber optic patch panel, we should have a better understanding of its structure. The following 1U rack mount patch panel is from FS.COM. It can support 4 fiber adapter panels or MTP/MPO fiber optic cassette. The top cover can be removed, which is convenient when installing the adapter or cassette. Inside the enclosure, there is nothing except two fixed screw holes position, which enables users to settle the panels or cassettes. Each rack mount enclosure is shipped with an accessory pack that includes mounting screws, spools, bend radius brackets for proper installation and cable ties for cable management.
Devices Used for 1U Rack Mount Enclosure Inside Cabling
There is a video to show clearly how 1U rack mount fiber enclosure inside cabling works. Here, we need 24 fiber optical splice tray, LC fiber adapter panel and spliced fiber pigtail.
Splice tray is a device used with other equipment to hold and protect optical fibers. This 24 fiber optical splice tray is equipped with self-contained slacking and spooling, mechanical splice holder, self-stacking modules with side latches and clear plastic hinged cover, designed to safely route and store optical fiber.
LC fiber adapter panel is designed for use with FHD series rack mount enclosures, providing a good protection for cables.
Fiber pigtails are used in terminating fiber cables through fusion splicing, in order to achieve accurate mounting for precision alignment of fiber optical components.
1U Rack Mount Enclosure Inside Cabling Installation
According to the video, the installation can be divided into two parts, fiber optic splice tray installation and cassette or adapter installation.
Step one, install fiber optic splice tray first. Undoing the screw to remove the top cover. Put 24 fiber optical splice tray into the 1U rack mount enclosure, and align the screws at the screw holes, then use a screw to fix it. Position another splice tray upright the fixed one. The 1U enclosure can hold 4 splice trays. Last, use a cable tie to make sure the fiber cords at the right location.
Step two, install cassette or adapter. Place slack spools over plastic rivets studs on sliding tray in a new 1U enclosure, and use screw to fix slack spools. Then insert LC fiber adapter panels into the enclosure. Unplug dust caps and connect the fiber pigtails. Note that make the pigtails go through the grommet for dust prevention. Finally, close the top cover.
FS.COM developed the 1U rack mount enclosure inside cabling installation to guarantee the smooth operation and efficient cable management of customers’ network. More details, please visit FS.COM.